Joe Bleau's
Vaio F Series Windows 7 Clean Install Guide Recovery Discs - F11 - F12 - F13
Updated: 2012-05-08, 02h53 (UTC-06:00) Central America
Check Vaio F Series Fan Cleaning or Keyboard Replacement to reduce the fan speed at idle by 500 RPM or more.
NOTE: this Windows 7 Vaio F clean install guide (some call it fresh install guide, fresh start guide or bloatware removal) is a work in progress and was originally created for the VAIO F11 & was updated with info pertinent to the F12 & F13. Eventually it will be split in 3: F11, F12 & F13 guides but it's basically the same process with some minor variations: abort the OEM recovery process after the Windows 7 installation and before the bloatware installation phase for a faster, leaner & fully activated & functional Windows 7 64-bit customized for your Vaio F Series notebook with all the special Vaio & Fn keys working perfectly.
 F13: It works too!
xingreen
reported here the differences vs. the F11 &
F12 processes described below:
F13: It works too!
xingreen
reported here the differences vs. the F11 &
F12 processes described below:
"...Followed the guide to do clean install and found that after the second reboot the application install screen is different from the guide for F12. It came up with installing Vaio Messenger first instead of the audio driver. I aborted the install process with CTL-ALT-DEL and the laptop booted into a clean activated Windows install with only Vaio Messenger installed. Good enough. Had to download the drivers and the recommended Vaio application from Sony website and install them manually. After all is done, the boot up time shortened to 1 min from 1 min 45s from the factory state."
The essence of the process remains the same: Vaio Recovery installs the Windows OS first w/ the required Vaio F13 specific drivers & after rebooting it installs the extra software & bloatware. It's just a question of identifying when & the exact name of the rebooting program. Please take some photos of all the different screens that appears during the process & email me, I will gladly add your observations for other F13 owners' benefit or give you some tips if you fail on the first try.
![]() If it's too complicated for you to follow, just keep
your original factory install & simply uninstall the software that is not
useful for you. Look in the bottom of this page for some
pointers about the bloatware you can safely remove. I tried both methods:
this clean install guide is cleaner & faster to do.
If it's too complicated for you to follow, just keep
your original factory install & simply uninstall the software that is not
useful for you. Look in the bottom of this page for some
pointers about the bloatware you can safely remove. I tried both methods:
this clean install guide is cleaner & faster to do.
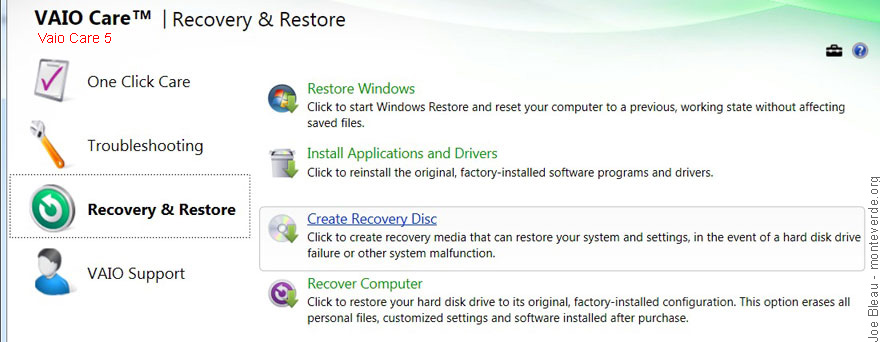
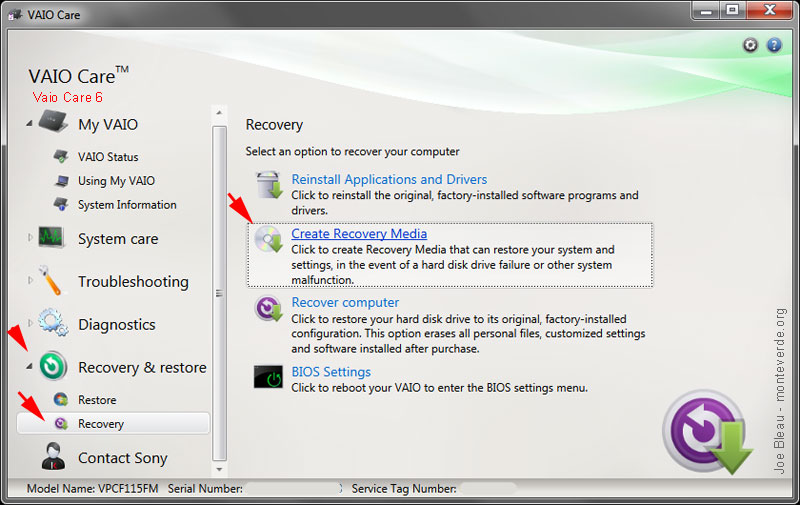
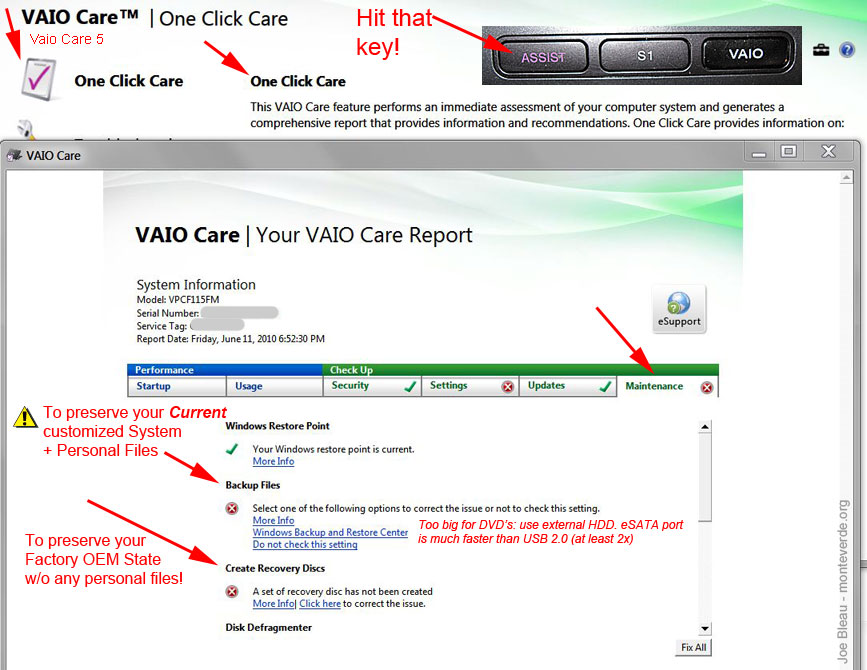
Before upgrading the hard drive in my Sony VAIO F Series US VPCF115FM laptop (500 GB 5400rpm to 500 GB 7200rpm), I created the OEM (Original Equipment Manufacturer) factory state recovery discs: > ASSIST > Vaio Care > Recovery & Restore > Create Recovery Disc (2 DVD's, more if you ordered extra software via CTO or if you have a VAIO F12 or VAIO F13 model with Office 2010 Starter and/or the Adobe bundle, etc):

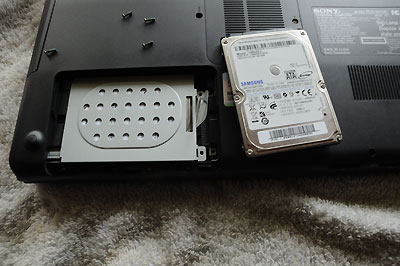
More info & photos in: How to Replace the Hard Disk Drive (HDD) of a VAIO VPCF Series Laptop
|
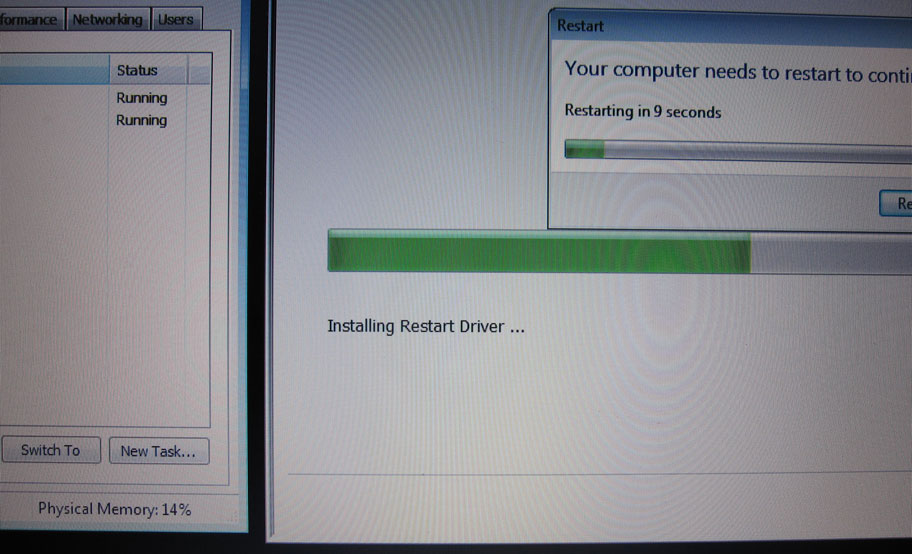
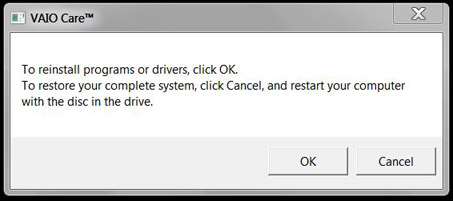
Sony Vaio F Series Owners OEM Clean Install Feedback: Thanks to DeWinte for this post explaining in a nut shell what this guide is all about, to kcirtaP for his comments here about his F12* experience using this guide. He also posted some screen captures of his German OS in his post here. Also to ajsuk about his F12 install here and Gandalf_The_Grey who said that some Value Added Software (Webcam Companion & Hardware Diagnostics) were missing from Vaio Care after the clean install was completed, see his feedback & links to missing stuff here. and finally to anseio for his F11 comments & screen captures here. All added some interesting comments & details and the content of this guide was modified accordingly. Check them out! - kcirtap, PwnCakes193, August1991 and djmafia did the same as I for their F12's & it worked. - danielh97 had a problem with his Vaio Update after the clean install but fixed it with this simple solution by Gandalf_The_Grey. - ajsuk wrote in his F12 feedback post: "The one thing that surprised me the most, after restarting towards the end of the installer and hitting ctrl+alt+del to be ready to kill the vaio care rescue task after "installing restart driver" appeared to get a fully clean install, my machine automatically shut itself down and restarted before I could kill the task. Windows then booted and finished setup - with no additional bloatware or any Sony software installed (other than the drivers). So the recovery (for me anyway) gave me a clean install of Windows 7 without my intervention." - anseio wrote in his F11 feedback post: "I followed the Clean Install process as described and interrupted it during the "Install Reboot Driver" phase. Upon restarting, I was given the error about Windows having not been properly installed and was thrown into a loop of rebooting and error message. I then thought "what could possibly happen if I let the process go a step further?". The worst is that I'll have to start over again or have 1 or 2 unwanted bloatwares to remove. What actually happened was that the next reboot was successful and there was a display to allow more programs (bloatware) to be installed. I clicked "Cancel" and that was the end of it. Super easy." |
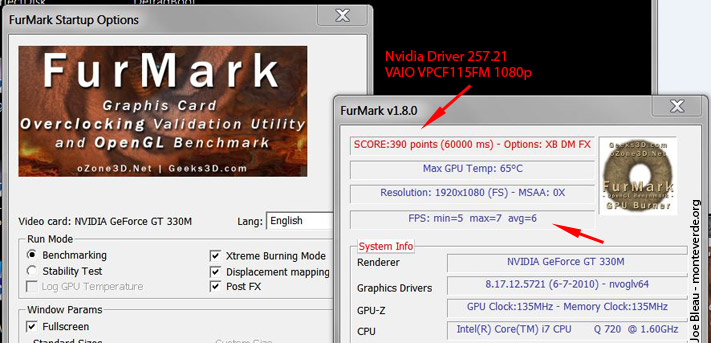
It was fast & smooth to automatically create a OEM recovery partition and install the full OEM Windows 7 Home Premium 64-bit OS and all the factory installed frills on my new HDD using the recovery discs instead of using an external HDD enclosure & a cloning utility. I took photos with a cheap Point & Shoot camera (P&S) of all the different windows showing up during the recovery process & noticed the line separating the OS installation itself from the rest of the optional programs. After searching a bit, I found this old 2007 thread: How to Optimize Any Sony VAIO With a Semi-Clean Install. While not specific to the VAIO F Series, the idea was the same: stop the full factory state recovery process after the Windows 7 OS is installed and before the rest of the software & trialware is installed. As the benchmarks illustrates below, it's a superfast & clean install, not a "semi-clean" install as the title of that old thread suggest. In fact, it's cleaner than when using a generic Windows 7 OS on a VAIO F Series laptop.
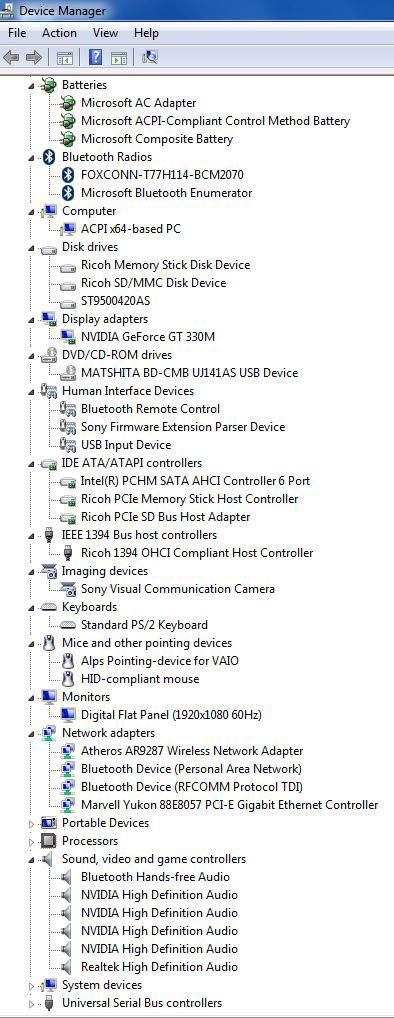
The advantage of this method is that in Windows 7 Device Manager, you won't get all the "unknown device" that ilfuca listed in his Win 7 fresh install guide for Vaio F series made with a generic off-the-shelf Windows 7 OS disc. Check also the Sony Support Clean Install Instructions for Windows 7 to see the Unknown devices examples. You don't have to do ilfuca's time consuming sonyextractor trick to extract the .mod files if you download the Vaio Software listed below in the red box from your model specific Sony esupport page and use your recovery discs.
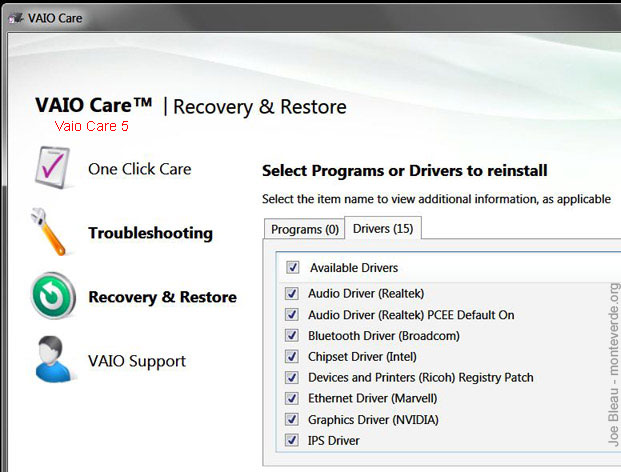
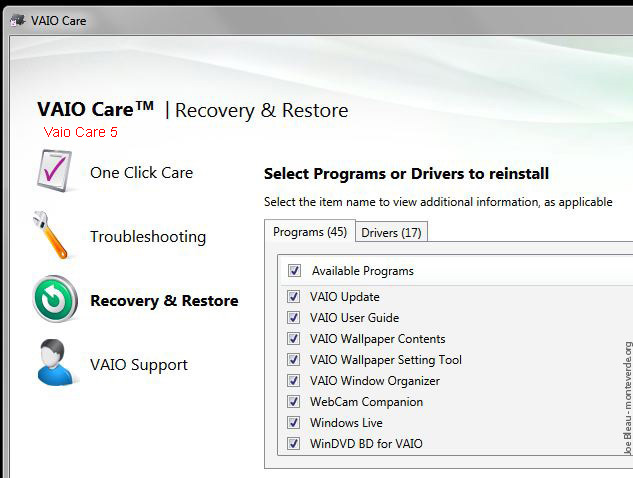
All the drivers but NOT any additional software besides the clean Windows 7 OS seen in > ASSIST > Vaio Care > Recovery & Restore > Install Drivers tab are automatically & fully installed when doing a Windows 7 clean install using this recovery discs method as well as the Intel Chipset Driver, the Intel PCHM SATA AHCI Controller 6 Port Driver and the Sony Firmware Extension Parser Device Driver and all the Ricoh drivers, etc.
So after using the VAIO F11 a while & trying all the programs & checking how much resources they were using & their usefulness for my needs, I decided to try a clean install with the recovery discs and a normal wired mouse.
Note that if you are installing on the OEM drive and want to keep the OEM recovery partition, you can use that partition to do the clean install described here w/o using the recovery discs by hitting F10 when booting or if the F is turned off: by simply hitting the ASSIST key. That's what tausif did as he posted here.
If you want the following then you need the recovery discs:
1- Clean install w/ formatting the OEM drive to eliminate the recovery partition
2- Clean install w/ formatting a brand new drive w/ or w/o that recovery partition
| How To Do a Clean Install with the VAIO F Series Recovery Discs |
This is for the F11, there are notes & a red box below about specifics for the F12 but the idea is the same with only small variations. That also applies to the Vaio F13. You can do it for the C: Drive only, full drive format, from recovery discs or from the OEM recovery partition, it's all the same idea.
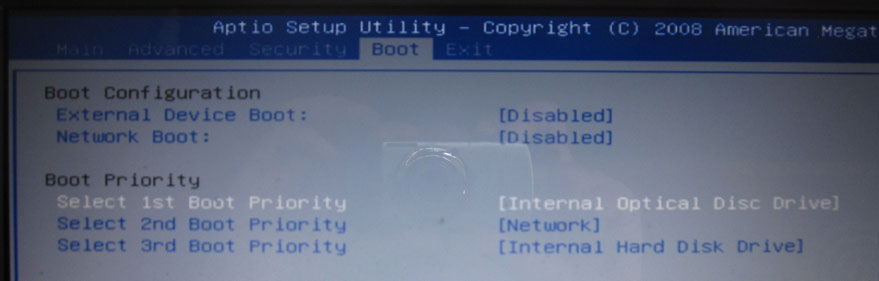
Insert recovery disc #1 & reboot, when the VAIO logo appears, quickly press F2 to access the VAIO VPCF BIOS menu > Boot Priority > 1st Boot Priority > Internal Optical Disc Drive then save & exit to reboot to the recovery DVD #1. The default VAIO F Series BIOS setting is 1st Internal Optical Disc Drive but I added this step just in case that your BIOS were customized, it's a short & easy step to run that check. After all was done, I set my boot order to Internal Hard Disk Drive first to have quicker booting time as the F will not waste time looking for media in the Optical drive nor look for an external device. This is a personal speed optimization preference.
When booting from the recovery disc #1 and selecting the Restore Complete System (called Vaio Care Rescue > Tools in the F12), there are some interesting options:
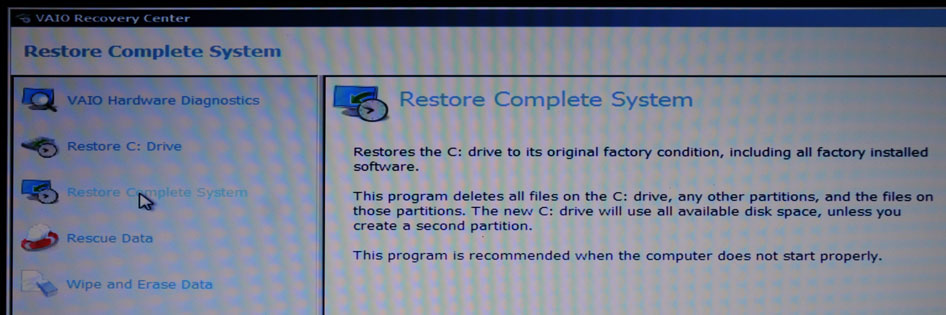
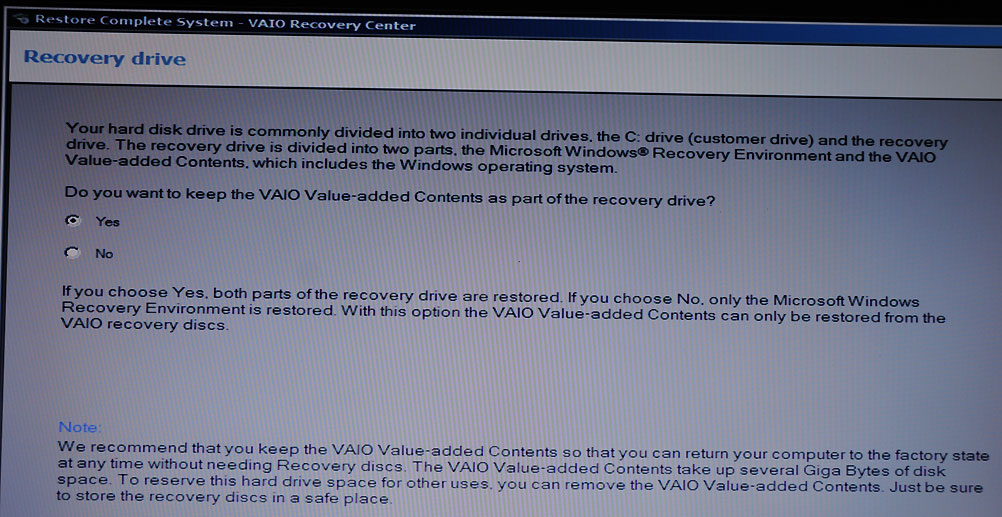
1- Option to keep or not the Value-added content to create a full factory state recovery partition - I kept it because it's only 8.66 GB out of the 465 GB HDD capacity and the Windows 7 OS will be included in the recovery partition. If you do not keep the Value-added content then only the Windows Recovery Environment will be saved in the smaller recovery partition BUT NOT the full Windows 7 OS nor all the extra software like WinDVD, Roxio, Vaio PMB, etc. F12: Office 2010 Starter, Adobe Bundle (If your Vaio F Series was bought from SonyStyle) and those are NOT available for public download on Sony esupport so don't loose those recovery discs if you make that choice!
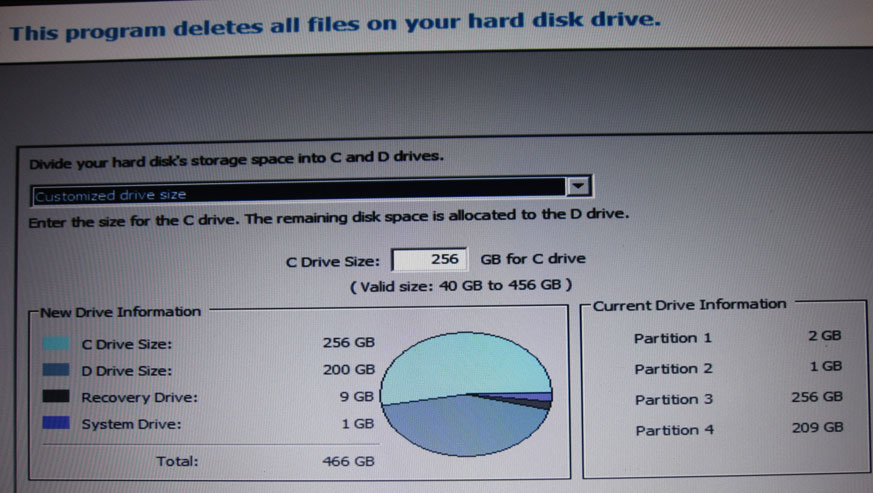
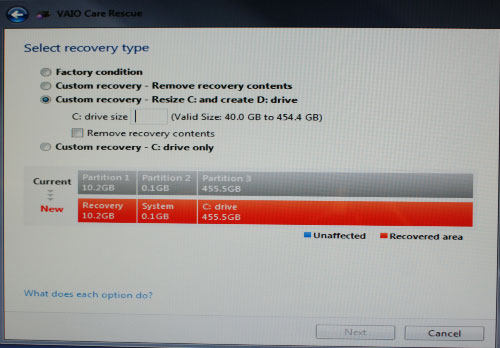
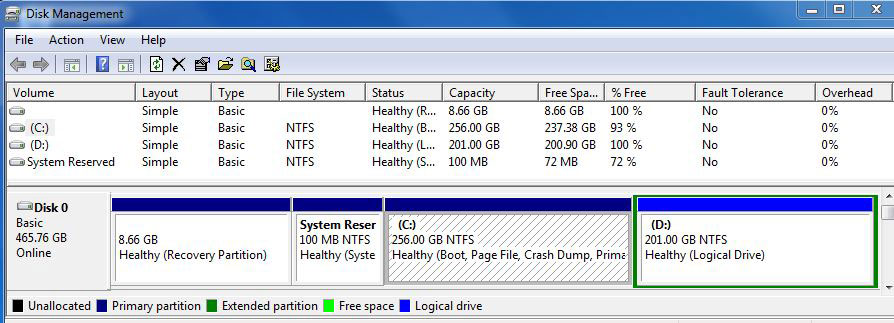
2 - Option to partition the drive, which I did: 256 GB for C & the rest for D: 201 GB (for backup, defrag & speed reasons and in case I want to migrate to a 256 GB SSD when the price goes down a bit. More info why in an eventual update). You can always delete the D partition anytime & enlarge (or shrink) C: with the freed space using Disk Management included in Windows 7. You don't have to create partitions & can choose to use the entire drive's capacity for C.
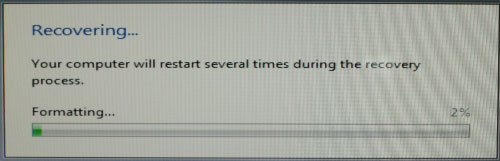
After a while, it will ask for disc #2 and so forth until your last recovery disc, then tells you to remove it, and the laptop will now reboot in Windows 7 (thanks djmafia for the feedback & observation posted here) and under Installing custom programs it installs Audio Driver Realtek (F13: Vaio Messenger!), Pointing Driver Alps, Installing Restart Driver [abort Restore Complete System application with Task Manager! (called "Vaio care rescue" on the F12 & F13*)] The trick is to quickly start Task Manager when you see Audio Driver Realtek (F13: Vaio Messenger!) by hitting Ctrl + Alt + Delete, highlighting the Restore Complete System (or F12: Vaio care rescue) application & get ready to kill it (End Task) when Installing Restart Driver appears. The system will reboot & may tell you that the process did not complete properly, disregard that. I just rebooted & it went away.
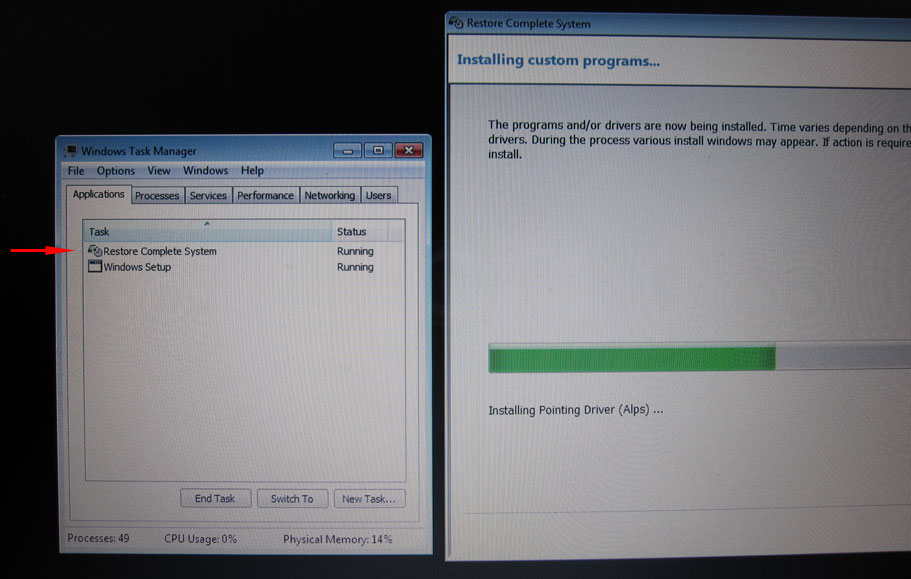
You now have a Windows 7 clean install customized for the VAIO F Series. You have to be sharp & ready to abort otherwise you have to do over the entire process again, about 35 minutes. The only glitch for me was that after everything was completed, including the steps below, is that I had to disable & enable again the touchpad to get it to work in S1 > Vaio Control Center > Keyboard & Mouse > Pointing Device. I presume it comes from the fact that the Alps driver is one of the last thing installed before the abortion. That's where the corded mouse comes handy if you are not good at navigating the OS with Tab + the arrows. Worst case scenario: uninstall/reinstall the Alps driver found on Sony Support or by using Vaio Care as described below.
What you get after reboot is this clean install, already activated w/o the need to enter a product key & with all the necessary specific drivers for your VAIO F Series and w/o ANY unknown devices in Device Manager contrary to a clean install done with a generic Windows 7 retail OS disc.
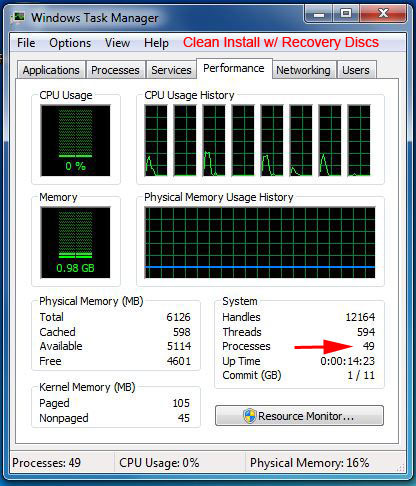
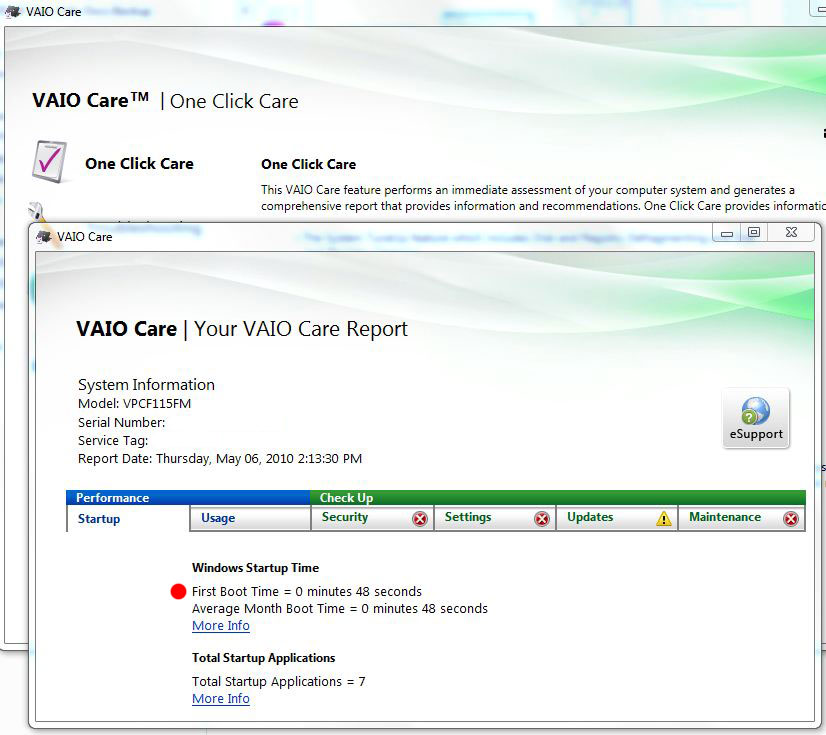
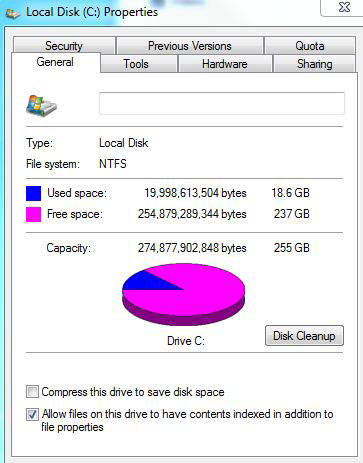
Note that the total occupied space on the HDD C: is only 18.6 GB in my case. First boot with the full factory OEM OS was 1:11 compared with 0:48 sec. with this OEM clean install, both on my upgraded Seagate 7200rpm HDD.
|
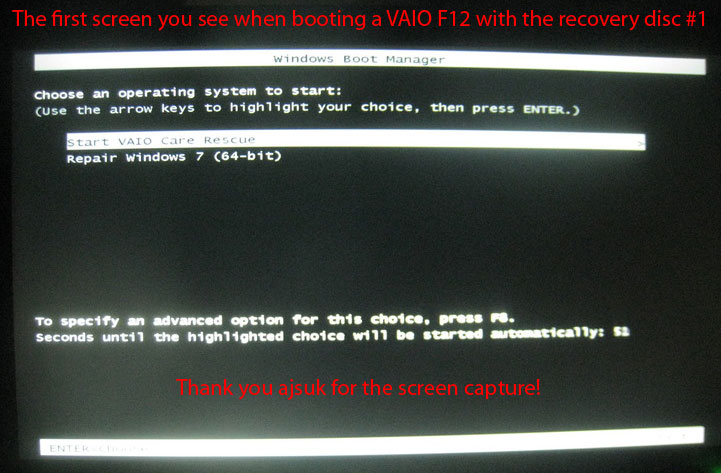
This is for the F12 & F13 only:
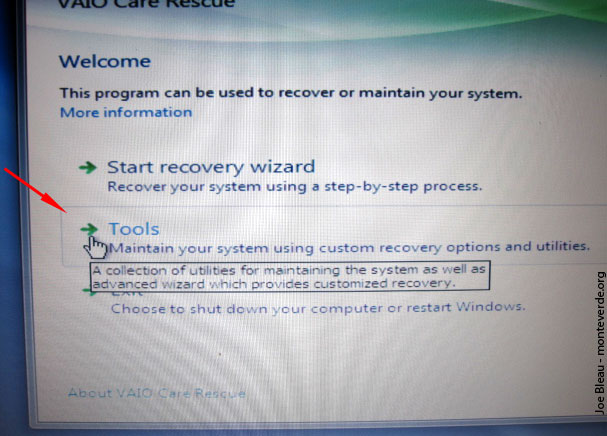
In the Windows Boot Manager window (black screen above), verify that Start VAIO Care Rescue is selected and then press the Enter key. In the VAIO Care Rescue window, click Tools instead of Start recovery wizard to access the customized recovery options.
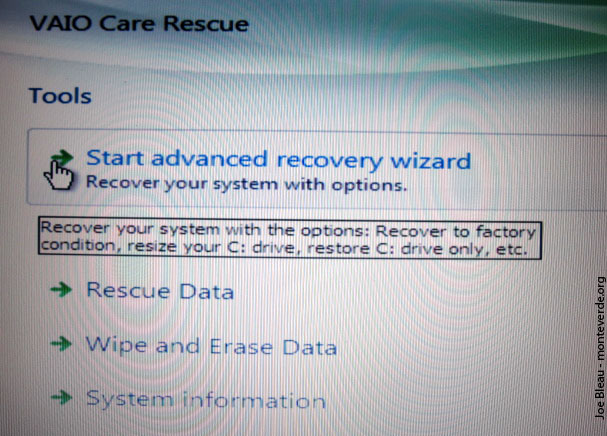
In the Tools window, click Start advanced recovery wizard .
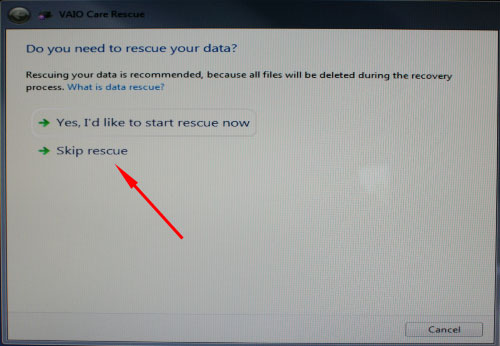
In the Do you need to rescue your data? window, click Yes, I'd like to rescue my data. NOTE: If you do not have any data on your computer that you need to back up, click the Skip Rescue button!
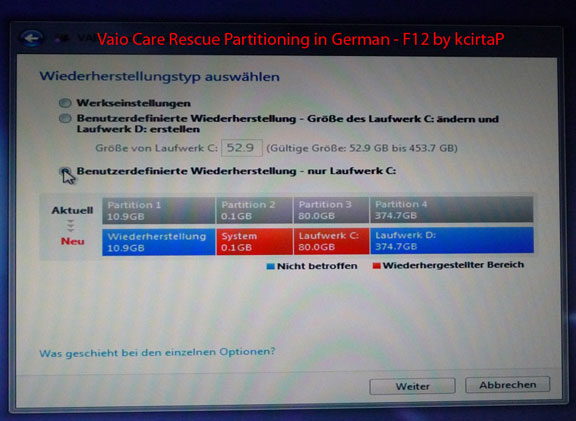
In the Select recovery type window, select the desired recovery option:
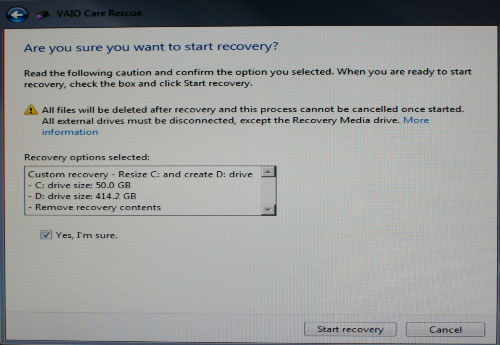
After that it's the same as described above: abort Restore Complete System application with Task Manager. |
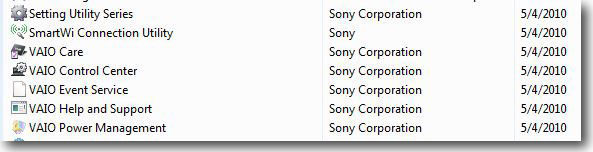
Installing the Useful Sony VAIO Software You could stop right there & would have a mean & lean fully working system but w/o the Vaio special buttons working (ASSIST, S1, VAIO & Fn+) & some Vaio software I find really useful like Vaio Care which I used for the report above with the Boot Time data. Go to the Sony Support page for your specific model and download & install these programs in this exact order: - Original - Sony Shared Library (under Drivers & Software > System Components) Note: this should be installed First! - VAIO Location Utility (under Drivers & Software > Sony Applications) - Original - VAIO Update 5 Software (under Drivers & Software > VAIO Update) - F12 only as it's not offered as a standalone download for the F11(included in F11's Vaio Care): Original - VAIO Hardware Diagnostics Software (under Drivers & Software > Sony Applications) - Original - Sony Notebook Utilities (under support page > Drivers & Software > Notebook Control and Utilities) download here from Sony US Support if it's missing in your discs as mentioned by Gandalf_The_Grey about his EU F11, works on F11 & F12, EU, US, etc, which includes: This utility installs the originally shipped versions of the following Sony Notebook Utilities:
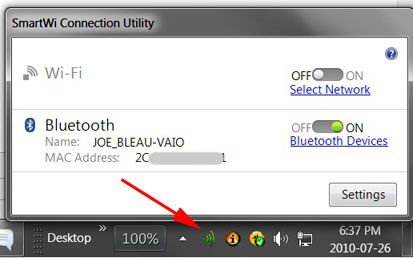
- Vaio Care; For the F12 under Drivers & Software > Sony Applications. F11: for some reasons, I can't see anymore (last checked on 2010-08-17) the original Vaio Care but only the VAIO Care Software Update on my esupport page (it could be there for your model's page). Not knowing if it was a full version or only an update, to be on the safe side, I simply inserted disc #1 & it automatically offered to install Vaio Care which I did & updated to Vaio Care 6.3 after rebooting. The following are Not necessary but I also installed them as they are convenient for me: - SmartWi Connection Utility (under Drivers & Software > Wireless) It's called VAIO Smart Network in some non-US F's (thanks Gandalf_The_Grey)
------------------------- JefDeLathouwer mentioned that some Value Added Software were missing on his recovery discs so this may be useful if you have the same problem: 1- WebCam Companion 3 Software 2- ArcSoft Magic-i Visual Effects Software - It works w/ Windows 7 64-bit contrary to what the page says. 3- WinDVD is found on your discs, not on Sony Support. 4- Roxio Easy Media Creator is found on your discs, not on Sony Support. 5- Other Value Added Software may have been included in your F version (Adobe Bundle or Office 2010 Starter for example) & usually those extra software bonus are found on your recovery discs only and are not available for the general public on Sony Support. Note: always reboot when asked, do not continue to install stuff after the system asks you to reboot! |
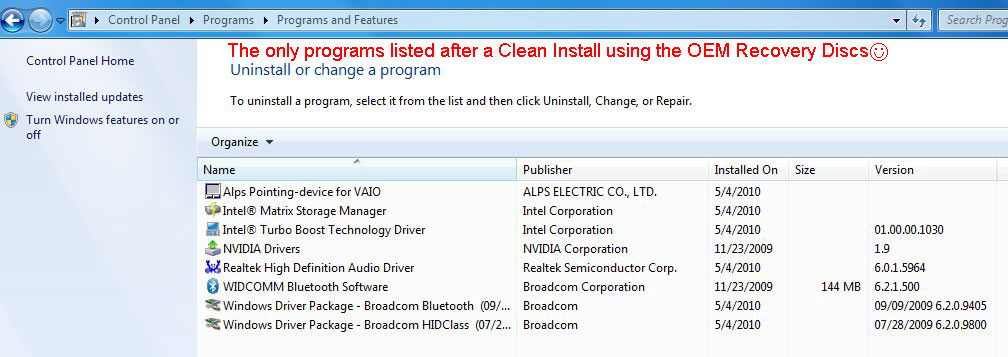
This is the only VAIO software shown in Control Panel > Programs & all my special keys & functions are working properly:
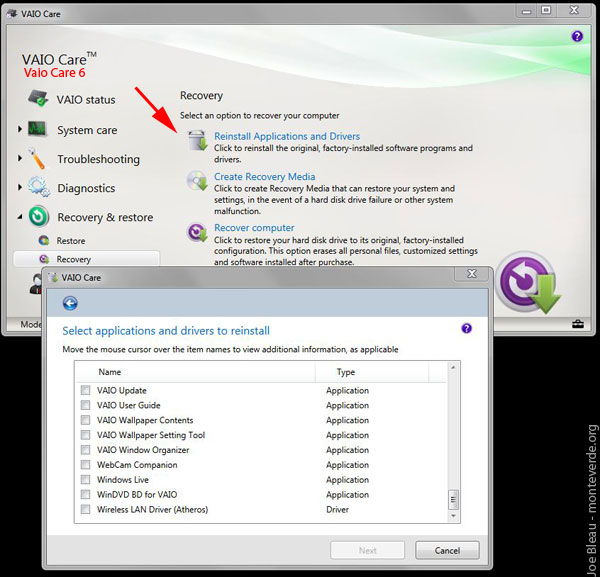
To install what you want from the list of software (WinDVD, Roxio, Adobe bundle (if bought from SonyStyle only), Sony's PMB, etc., those added value software are NOT available for download on esupport) & Vaio extra software listed with comments below, just insert recovery disc 1. After that, you can use the disc to install more programs or eject the disk and install with > ASSIST > Vaio Care > Recovery & Restore > Install Applications & Drivers.
1- Connect to the web & run Windows Update to download a ton of patches for Window 7 that will need several reboot.
2- After updating Windows: Start > search & run: Disk Cleanup & Disk Defragmenter.
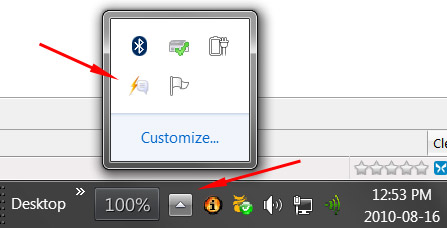
3- Click on the Vaio Update icon near the clock or go to > ASSIST > Vaio Care > VAIO Support > eSupport & download the most recent updates for your machine. Note: don't download updates for bloatware that you chose not to install by using this guide! See my preferred setting to manual for Vaio Update below.

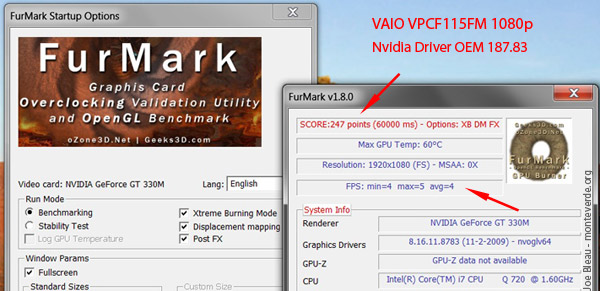
4- Check the Vaio F Series Owner's thread for links to updates not on eSupport like Nvidia's latest video driver for example which is faster & more efficient in games but also in Photoshop (check zooming & panning demo videos here), Adobe Lightroom, etc. I am using NVIDIA 258.96 @ the present & it's working fine with much better benchmarks than the OEM driver found on esupport.
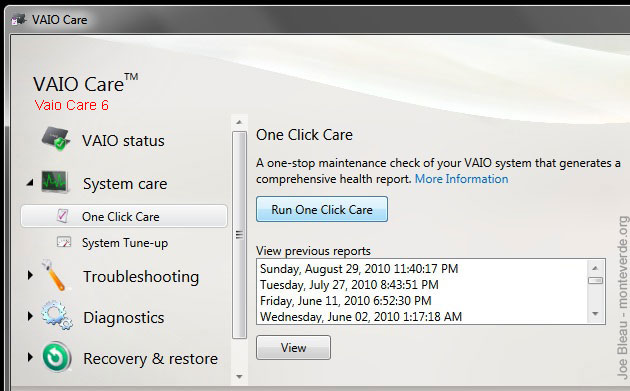
5- I strongly suggest running Vaio Care > One Click Care to see a complete picture of what you have to do on your system & clean & defrag the registry, etc.
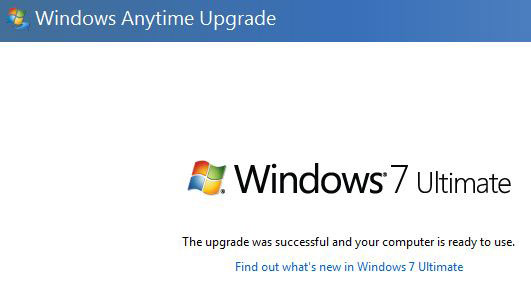
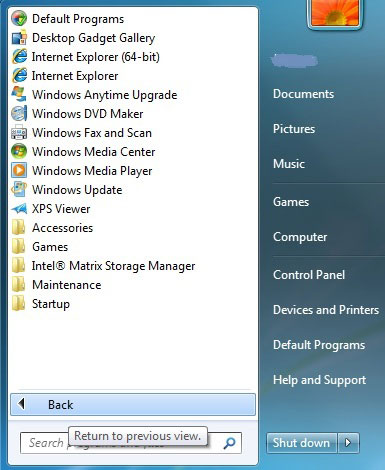
- After all that, I entered my Windows 7 Ultimate key in > Start > Anytime Upgrade to unlock the features already contained in the Home Premium OEM OS & voila, it was now an Ultimate OS in less than 5 minutes. The only reason I needed Ultimate is the language packs for the OS representation (Spanish & German in my case). The Ultimate or Professional versions are not any faster nor more efficient than the Home version. They only have a few extra features. Check this article for more details: Windows 7 editions.
Note: you can use this OEM clean install method & then use your full OS Pro or Ultimate key & then you have to call Microsoft to activate it. It's faster than starting from scratch with a Generic Pro or a Generic Ultimate & then have to install all the missing drivers & patches IMO.
You can preserve that clean install you just did by creating a
full system image clicking on the Backup Files
seen in the Vaio Care report shown above or by pasting this in
Explorer: Control Panel\All Control Panel Items\Backup and
Restore. You could also install your most important
favorite programs, update them & then create said system image. If
one day you have major problems, you could use that image to restore
your computer instead of using the OEM recovery discs or partition &
redo the entire process again!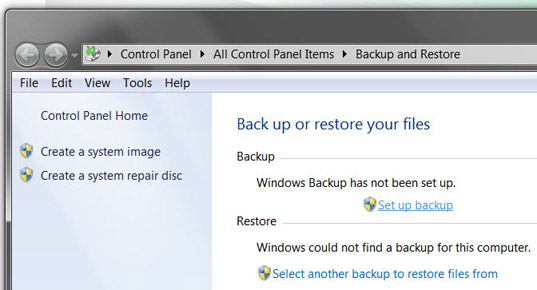 Creating a full system image every week or so on an external eSATA drive is computer safety 101 as if your hard drive dyes for example, you will loose only 1 week of work/modifications/updates at most. Naturally if you do critical work, daily backups is recommended. If your external drive is connected via USB 2.0, it will take forever as your data accumulates. |
These are screen captures done after the custom OEM recovery discs clean install was completed

The shear number of Vaio F Series model numbers variations makes it difficult to compare specs & prices:
VPCF111FX VPCF111FX/B VPCF111FX/H VPCF112FX VPCF112FX/B VPCF112FX/H VPCF113FX
VPCF113FX/B VPCF113FX/H VPCF114FX VPCF114FX/B VPCF114FX/H VPCF115FMVPCF115FM/B
VPCF116FX VPCF116FX/B VPCF116FX/H VPCF117FX VPCF117FX/B VPCF117FX/H VPCF1190X
VPCF119FX VPCF119GX VPCF119HX VPCF11AFX VPCF11AFX/B VPCF11BFX VPCF11BFX/B
VPCF11CGX VPCF11CGX/B VPCF11DGX VPCF11DGX/B VPCF11EGX VPCF11EGX/B VPCF11FGX
VPCF11FGX/B VPCF11GGX VPCF11GGX/B VPCF11HGX VPCF11HGX/B VPCF11JFX VPCF11JFX/B
VPCF11KFX VPCF11KFX/B VPCF11KFX/H VPCF11LFX VPCF11LFX/B VPCF11LFX/H VPCF11MFX
VPCF11MFX/B VPCF11NFX VPCF11NFX/B VPCF11NFX/H VPCF11PFX VPCF11PFX/H VPCF11QFX
VPCF11QFX/B VPCF11QFX/H VPCF121FX VPCF121FX/B VPCF121FX/H VPCF121GX VPCF121GX/B
VPCF121GX/BC VPCF122FX VPCF122FX/B VPCF122FX/H VPCF123FX VPCF123FX/B VPCF123FX/H
VPCF125FX VPCF125FX/B VPCF125FX/H VPCF126FM VPCF126FM/B VPCF127FX
VPCF127FX/B VPCF127FX/H VPCF1290X VPCF12AFM VPCF12AFM/H VPCF12BFX VPCF12BFX/B
VPCF12BFX/H VPCF12CFX VPCF12CFX/B VPCF12CFX/H VPCF12DFX VPCF12DFX/B VPCF12FFX
VPCF12FFX/B VPCF12GFX VPCF12GFX/B VPCF12HFX VPCF12HFX/B VPCF12JFX VPCF12JFX/B
VPCF12KFXVPCF12KFX/B VPCF12LFX VPCF12LFX/B VPCF12LFX/H VPCF12LGX VPCF12LGX/B
VPCF12MGX VPCF12MGX/H VPCF12NGX VPCF12NGX/B VPCF12PGX VPCF12PGX/B VPCF12QGX
VPCF12QGX/B VPCF12RGX VPCF12RGX/B VPCF12SGX VPCF12SGX/B VPCF12THX VPCF12THX/H
VPCF12UGX VPCF12UGX/B VPCF12VGX VPCF12VGX/B VPCF12XHX VPCF12XHX/B VPCF12YFX
VPCF12YFX/B VPCF12YFX/H VPCF12ZFX VPCF12ZFX/B VPCF12ZFX/H
VPCF132FX VPCF132FX/B VPCF132FX/H VPCF133FX VPCF133FX/B VPCF133FX/H VPCF134FX
VPCF134FX/B VPCF134FX/H VPCF136FM VPCF136FM/B VPCF136FM/H VPCF136FX VPCF136FX/B
VPCF136FX/H VPCF137FX VPCF137FX/B VPCF137FX/H VPCF1390X VPCF13AFX VPCF13AFX/B
VPCF13BFX VPCF13BFX/B VPCF13CGX VPCF13CGX/B VPCF13DGX VPCF13DGX/B VPCF13EFX
VPCF13EFX/B VPCF13FGX VPCF13FGX/B VPCF13GGX VPCF13GGX/B VPCF13HFX VPCF13HFX/B
VPCF13JFX VPCF13JFX/B VPCF13KGX VPCF13KGX/B VPCF13LGX VPCF13LGX/B VPCF13MGX
VPCF13MGX/B VPCF13NFX VPCF13NFX/B VPCF13PFX VPCF13PFX/B VPCF13QFX VPCF13QFX/B
VPCF13SFX VPCF13SFX/B
Please Note: This site is a work in progress & new content & updates are added almost every day as we are in rainy season @ the present. :-\
© 2012 Permission to reproduce content if credited & linked to VaioFseries.com | design rtbizards.com
